Developing a RESTful API with Gin
Can you imagine having a programming language with a fast web framework to create a RESTful API with the ability to handle heavy traffic?
Well, In this article, you’ll understand RESTful API’s overall development and creation with the Gin web framework.
So, Let’s get started.
What do you mean by Gin?
Gin is an HTTP web framework in the Golang programming language. It’s fast and has minimal memory allocation.
The main attraction of gin is that it is simple to get started with & you can work easily with it.
Why Gin?
The first and foremost benefit of using Gin is that you’ll get enough infrastructure within yourself.
After using the Gin, you can simply have your applications up and running.
- Gin is very easy and fast to make use of it.
- Gin makes the code precise so that it can be read easily.
- It has the feature of automatic routing.
- Gin is an in-build logger.
- It primarily supports templating as well.
- Gin is a middleware for adding functionality.
- Golang Gin has a great community behind it. That’s why it is widely used.
What do Endpoints mean?
When you come across the term endpoint a question must pop up in your head what does the endpoint mean?
Please give it a read to know more.
An endpoint is the one end of the communication channel.
When an API interacts with another system, the main touchpoints of this sort of communication are called endpoints.
The URL of the API with the particular resource is called the endpoint.
What are the ways of creating the API endpoints?
There are certain initial stages that need to be followed by Developers as follows are mentioned below. As It starts with the initial setup of the application, Debugging the Visual Studio Code.
In image 1, Right after the package main function(A program is always being found in package main), we have imported the “fmt” in the visual code editor.
On line 7, we have created a todo type struct wherein we have inserted ID, Title, and Description within the string datatype. Moreover, there is also json form of representation of such particular fields named ID, Title, Description, etc.
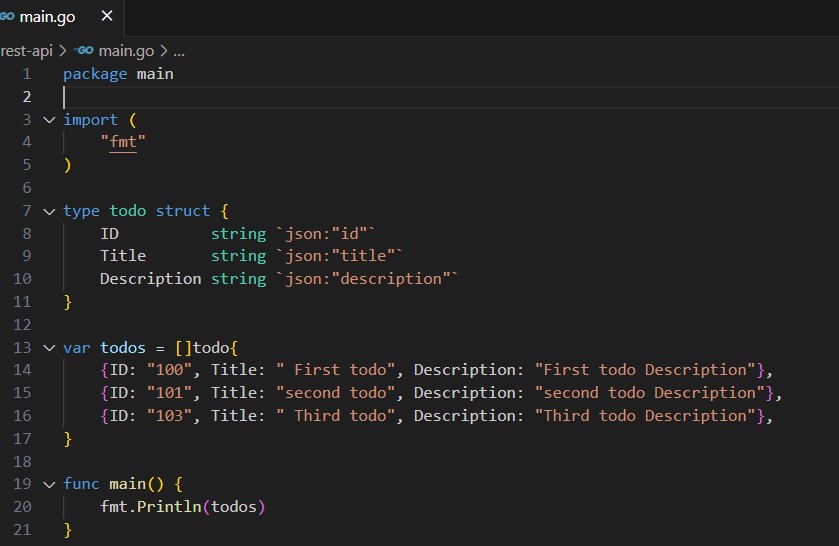
(Image – 1)
So, Let’s see the output for the same in the visual code editor.
![]()
In addition to this, On line number 14,15, and 16 todos are defined in the form of slices.
The output of the above code is {100 First todo Description} {101 second todo Description} {103 Third todo Description} in the Visual Code editor.
Hence, in the next section, we will witness how to implement the endpoint for the same.
GET Request
In addition to the existing code, we will write code in order to get the first endpoints.
In the image -2, On line 21 we have created a simple GET API request.

(Image -2)
The gettodo function creates JSON from the slice of the todo struct.
Moreover in this code, the *gin.Content is the most important chunk of gin. Under the func getalltodo function, it contains the c *gin.context.
POST Request
In the POST request section, it adds a new album from request data sent as JSON.
Post is also another http function on line 24 as posttodo.
/todo
- GET
- POST
/todo/:id
- GET

(image-3)
Bindjson
BindJson is used to bind all the data that we receive from the request.
On line 27, c.BindJSON to bind the requested body to newtodo.

(image-4)
Let’s Create the Router Request
To get started with router request, will first have to create a default module for gin. It contains some default middlewares, longer middlewares, And a recovery model that gin gives us by default.
On line 32, under the default module, we have inserted the GET, GET ID, and POST functions.
In addition to this, on line 37 the router.run function is being sent to the http server in order to start a new server.
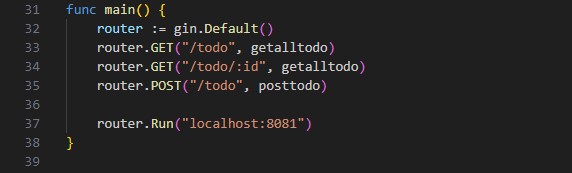
(image -5)
Let’s take a look at how this code looks in localhost:8081/todo in the browser.
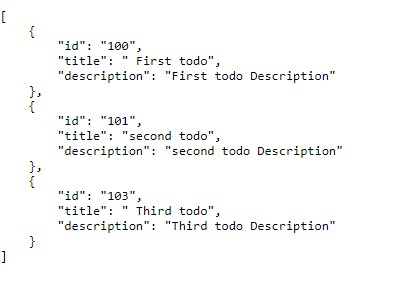
(image – 6)
Test with Postman
If you have never come across Postman and would want to use it? Or if you are thinking to hire Golang developer for this.
Then wait a min and read this section about Postman.
Then you’ll definitely get familiar with the overall functioning and concepts of Postman.
So, let’s begin.
Postman sends the request from a client to a server. It’s a tool that is used to test API.
Now Let’s see how the code will run under the Postman.

(image -7)
As you can simply look at the image-6 that the given request is localhost:8081/todo and the response for the same is the following:-
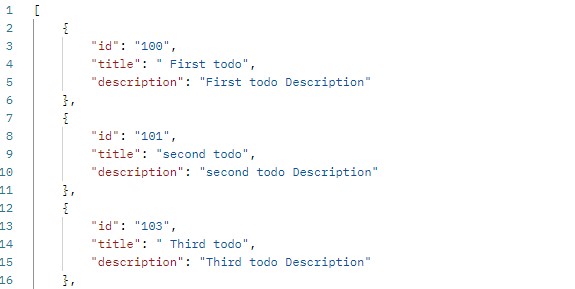
(image-8)
Conclusion
To conclude the whole article, we have successfully understood the overall concept of how to create a RESTful API using GIN.
Hopefully reading this article will make a difference in your own understanding.
Thanks for reading!
The complete code
package mainimport ( “net/http”
“github.com/gin-gonic/gin”
)
type todo struct {
ID string `json: “id”`
Title string `json: “title”`
Description string `json: “description”`
}
var todos = []todo{
{ID: “100”, Title: ” First todo”, Description: “First todo Description”},
{ID: “101”, Title: “second todo”, Description: “second todo Description”},
{ID: “103”, Title: ” Third todo”, Description: “Third todo Description”},
}
func getalltodo(c *gin.Context) {
c.IndentedJSON(http.StatusOK, todos)
}
func posttodo(c *gin.Context) {
var newtodo todo
c.BindJSON(&newtodo)
todos = append(todos, newtodo)
c.IndentedJSON(http.StatusCreated, newtodo)
}
func main() {
router := gin.Default()
router.GET(“/todo”, getalltodo)
router.GET(“/todo/:id”, getalltodo)
router.POST(“/todo”, posttodo)
router.Run(“localhost:8081”)
}